Rclone
This guide provides instructions for configuring the rclone tool. Rclone is a versatile tool that supports connections to various types of storage, but this guide focuses specifically on Object Storage, namely the S3 service.It is applicable for both Windows and Linux users. Using rclone with S3 allows you to create buckets, sync folders, upload and download files, and much more.
Downloading and Installation of Rclone Tool
First, you need to download and unzip the appropriate rclone version according for your operating system.
We strongly recommend to use the latest versions of rclone available on rclone websites. Using an older version from system repositories may cause errors. If you manually install rclone into your user profile, you can update it using the following command:
rclone selfupdateLinux - Manual Installation in User Profile
First, unzip the rclone archive after downloading.
unzip rclone-v1.59.1-linux-amd64.zipThen, copy rclone binary file into the pre-prepared bin folder in the user profile/home.
cp ./rclone-v1.59.1-linux-amd64/rclone ~/bin/In the final step, add the path to the rclone binary file to the PATH environment variable.
PATH=~/bin:$PATHPersistent setup
For persistent presence of the rclone binary file path in the PATH variable, add the following line into .bashrc file:
echo 'PATH=~/bin:$PATH' >> .bashrcAlternatively, place the rclone binary file in the system path:
/usr/local/binFinally, a quick check the PATH variable to ensure the desired path is included.
echo $PATHIf you installed the rclone using the steps above, you can update it with the following command:
rclone selfupdate2022/08/25 11:54:07 NOTICE: Successfully updated rclone from version v1.59.0 to version v1.59.1
Windows - Manual Installation in User Profile
First, create a bin directory in your user profile, where the rclone.exe file will be placed. You can easily create this directory by entering the following command in the file browser:
%USERPROFILE%In the displayed directory,right-click and select -> New –> Directory/Folder. Name the folder bin. Then, move the rclone.exe file into this folder. The rclone.exe file can be found in the unzipped rclone archive that you downloaded from the rclone website.
In the next step click on Start (1) and search for Edit the system environment variables (2).

Next, click on Environment variables (1) in the displayed window.

In the User variables for UserXY (1) section, select the Path (2) variable, and then you click the Edit (3) button.

To add a new path, click the New (1) button, then enter the path to the pre-created “bin” folder (2), as shown below. Confirm the setup by clicking the OK (3) button.
%USERPROFILE%\bin
Finally, click OK and Apply.
If you installed the rclone using the steps above, you can update it with the following command:
rclone selfupdate2022/08/25 11:54:07 NOTICE: Successfully updated rclone from version v1.59.0 to version v1.59.1
Basic Rclone Configuration
Below is a guide for the basic configuration of rclone tool. There are two guides provided: the first describes configuration using the command line, and the second explains configuration using the graphical user interface.
Rclone Configuration Using the Command Line
Before configuring the rclone tool using this guide, you must first download, unzip, and install rclone. The installation instructions can be found in the first section.
Rclone offers a configuration wizard that will guide you through the setup of your S3 data storage step by step.
Command line in Windows and Linux: Windows users need to run Command Prompt and then run the command below. Linux users can open the terminal window and then run the command below.
rclone config
From the list of options, select New remote by typing the letter n. Next, enter the name for our connection/storage, such as cesnet_s3. Then, choose the Option Storage - select Amazon S3 Compliant Storage Providers by entering its number in the list.
Always find the option number by the text description - the actual number of the recommended option may differ from the number shown in the screenshot!

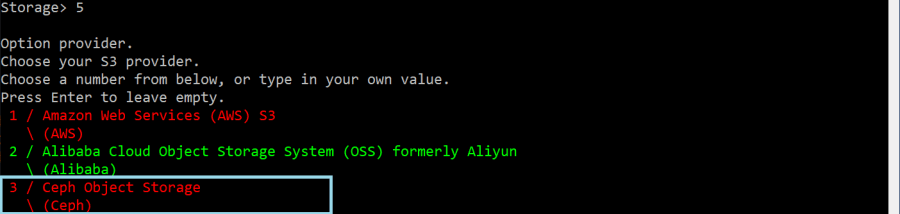
In the next step, choose Option provider, in this case Ceph Object Storage.
Then, you will need to choose how to enter your S3 credentials. In this case, select Enter AWS credentials in the following step.

In the next steps, enter your access_key_id and secret_access_key, which you either received from the administrator or generated yourself with the Gatekeeper service .

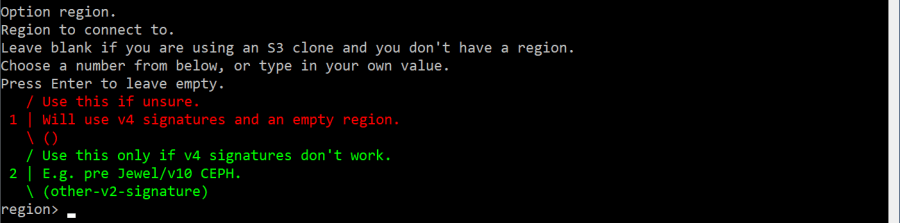
Next, select the Option region. Leave this field empty and press Enter to continue.
Enter the Option endpoint corresponding to the data center for which you generated the credentials (s3.cl2.du.cesnet.cz as an example). Check the Gatekeeper service if you do not rememeber the endpoint address.

Next is Option location_constraint. We will leave this option empty and proceed by pressing Enter.

In Option acl, either select Owner gets FULL_CONTROLL, or leave this option empty and proceed by pressing Enter.

In the next step, select Option server_side_encryption, for example None.

Then, you select Option see_kms_key_id, for exapmle None.

Now, select Edit advanced config, here, for instance, No, option n.

In the final step, review the configuration and confirm it by typing the letter y.

Rclone Configuration Using Graphical User Interface
Before configuring the rclone tool using this guide, you must first download, unzip, and install rclone. The installation instructions can be found in the first section.
First, launch the GUI. Windows users should open Command Prompt and run the command below while Linux users can simply open a terminal window and run the command below.
rclone rcd --rc-web-guiThe following steps are identical for both Windows and Linux.
Once the graphical interface starts, click on the Configs (1) button in the left menu, then click Create a New Config (2).
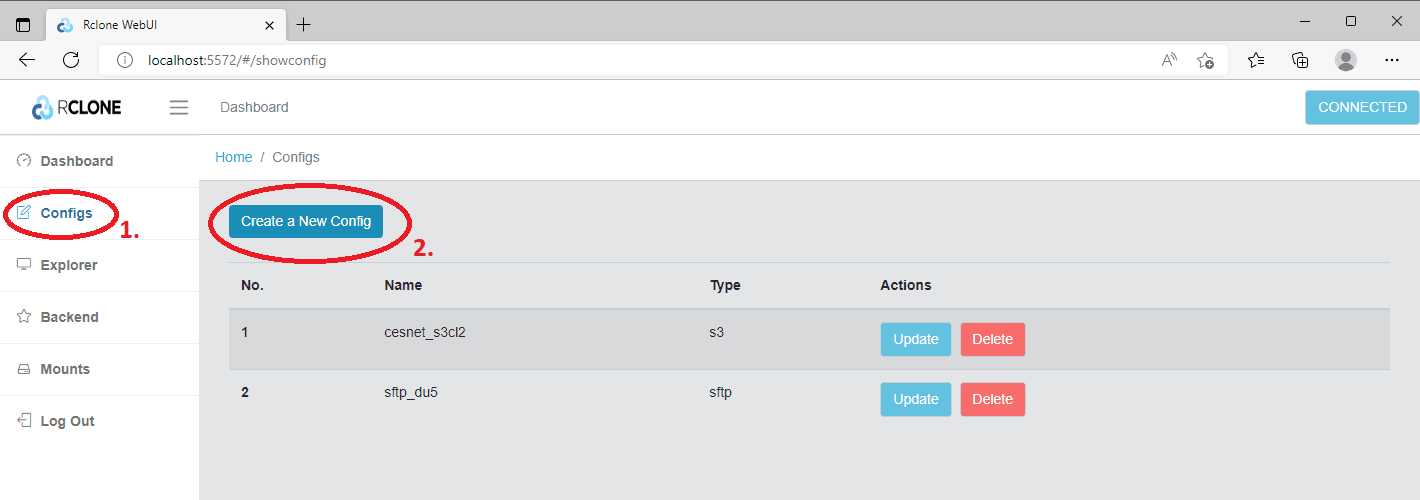
In the displayed window, enter the connection name (e.g.cesnet_s3cl2) and select Amazon S3 Compliant Storage Providers.

Next, you need to input the credentials (1) provided by the administrator or generated by you. In the Choose your S3 provider field, enter Ceph. Then, input theS3 endpoint address (2). After that, click Next.

Please be careful during the modification in the Configs section. Rclone GUI sometimes does not save the changes in the configuration. We strongly recommend to cross-check the configuration file after saving.
Uploading Data from Your Local Machine
Once the configuration is complete, you can start transfering the data.
In the left menu click on the Explorer (1) button. Then, select the configuration name (2), such as cesnet_s3cl2 and click on the Open (3) button. A window will display the buckets and files from the configured data storage.

Graphical user interface of rclone DOES NOT SUPPORT creation of empty buckets and directories. If you copy your data from the local machine you have to copy the directory with data. Alternatively, you can prepare empty buckets using command line.
To upload your data, click on upload icon (1) in the dispayed window. Then you can either select the data from your disk or drag and drop the files into the window.

Configuration File
The configuration file can be found at the location described below. It contains the credentials and all the selected options.
Windows config file
%APPADATA%\Roaming\rclone\rclone.conf (C:\Users\USER_NAME\AppData\Roaming\rclone\rclone.conf)
[cesnet_s3]
type = s3
provider = Ceph
access_key_id = my-access-key
secret_access_key = my-secret-key
endpoint = s3.cl2.du.cesnet.cz
acl = private
Linux config file
~/.config/rclone/rclone.conf
[cesnet_s3]
type = s3
provider = Ceph
access_key_id = my-access-key
secret_access_key = my-secret-key
endpoint = s3.cl2.du.cesnet.cz
acl = private
Rclone Basic Controls
All available rlone commands can be listed using the command
rclone helpAlternatively, you can find the rclone guide on the rclone website. Below are some selected commands for managing buckets, directories and files.
Listing Buckets and Directories
Listing of the available profiles/connections.
rclone listremotes
cesnet_s3_encrypted:
cesnet_s3cl2:
sftp_du4:
sftp_du5:
Listing of buckets of the selected profile/connection.
rclone lsd cesnet_s3cl2:
  -1 2020-11-11 08:53:48        -1 111
  -1 2022-07-28 10:03:20        -1 test
Creating, Copying, and Deleting Buckets…
Creation of the new bucket.
rclone mkdir cesnet_s3cl2:test-bucketDeletion of the bucket.
rclone rmdir cesnet_s3cl2:test-bucketCopying the files.
Rclone cannot create empty folders, see the error below.
rclone mkdir cesnet_s3cl2:test-bucket/empty-directory

2022/08/24 12:18:36 NOTICE: S3 bucket test-bucket path empty-directory: Warning: running mkdir on a remote which can't have empty directories does nothing
The solution is to use full path within the bucket, including a non-existing directory, when copying. If you specify a non-existing directory, rlone will create it automatically, see the example below.
Copy the files:
rclone copy ~/test_file1.pdf cesnet_s3cl2:test-bucket/new-dir1/new-dir2/Next, check the files using ls command, where you can see that the folders have been created, namely new-dir1 a new-dir2:
rclone ls cesnet_s3cl2:test-bucket
3955866 new-dir1/new-dir2/test_file1.pdf
Deleting a file
To delete a specific file, use deletefile command, or use the delete command to remove all files in the specified path.
rclone deletefile cesnet_s3cl2:test-bucket/new-dir1/new-dir2/test_file1.pdfIf you delete the only file (object) in a directory, resulting in an empty directories structure, the empty directories will also be deleted! In object storage technology, directories are represented by the names of specific objects (files), so the deletion of empty directories is expected behavior.
Directory Syncing
To sync the directories, you can use the sync option. Synchronization only affects the content on the target side; no changes are made to the source side.
Below is an example of rclone sync command, which includes recommended options explained further below.
rclone sync --dry-run --progress --fast-list ~/source-dir cesnet_s3cl2:test-bucket/Syncing process
The command above always syncs the content of the source directory, regardless of whether OR NOT you use a slash at the end of the source directory. In this regard, rclone behaves differently from rsync.
The command above contains several recommended options.
Option dry-run allows performing the dry-run sync with listing the potential changes. It does not make any changes on the target side, but allows you to check that the changes it lists correspond to your plan. To perform the actual sync, ommit the —dry-run option from the command.
--dry-runOption progress allows seeing the continuous progress of the sync.
--progressThe fast-list option helps limit the number of API requests, which can improve the transfer speed for larger datasets. It makes a single request to read information about 1000 objects and stores it in memory.
--fast-listthe interactive option allows you to decide interactively which changes to accept or reject on the target data storage.
--interactiveData Integrity Verification
Improving check speed
All commands related to data integrity checks should include the --fast-list option, as mentioned above. Using the --fast-list option will accelerate the speed of integrity checks.
Rclone allows testing ntegrity of the transferred data.
rclone check --fast-list C:/Users/Alfred/source-for-sync/my-local-data cesnet_s3cl2:test-syncThe command verifies checksums on both the source and target sides. For quicker checks, you can use the --size-onlyoption, which only checks the file sizes.
rclone check --fast-list --size-only C:/Users/Alfred/source-for-sync/my-local-data cesnet_s3cl2:test-syncTo verify data integrity on encrypted buckets, use the cryptcheck option, which is explained in the guides related to encrypted buckets. If you use the check option on an encrypted volume, it will trigger a forced download of all data in the specified path. These unnecessary forced downloads can slow down your client.
Configuration and Management of Encrypted Buckets
This section outlines the configuration and management of encrypted buckets using the rclone tool, focusing on client-side encryption. Below, you will find guides for setup using the command line and the graphical user interface.
Configuration Using the Command Line
To configure the rclone tool using this guide, you must first download, unzip and install rclone. Instructions for this can be found in the first section.
Rclone features a wizard that simplifies the setup of an encrypted bucket.
Windows users need to open the Command Prompt, where they can directly start the rclone configuration using the command below.
Linux users only need to open the Terminal window and proceed with the following rclone command.
rclone config
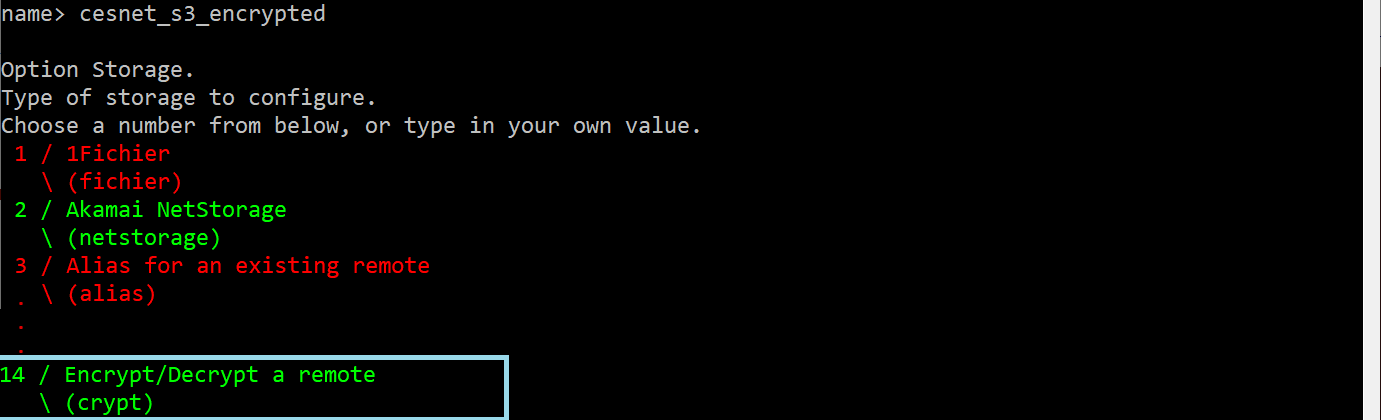
From the displayed list of the options, select New remote by typing n. Next, enter the name of your data storage, for example, cesnet_s3_encrypted. Then, choose Option Storage, and select Encrypt/Decrypt a remote.
In the next step, define Option remote. Here, you must select existing S3 profile/connection and specify the name of the bucket where rclone will create the encrypted space, using the format s3-profile:bucket-name.

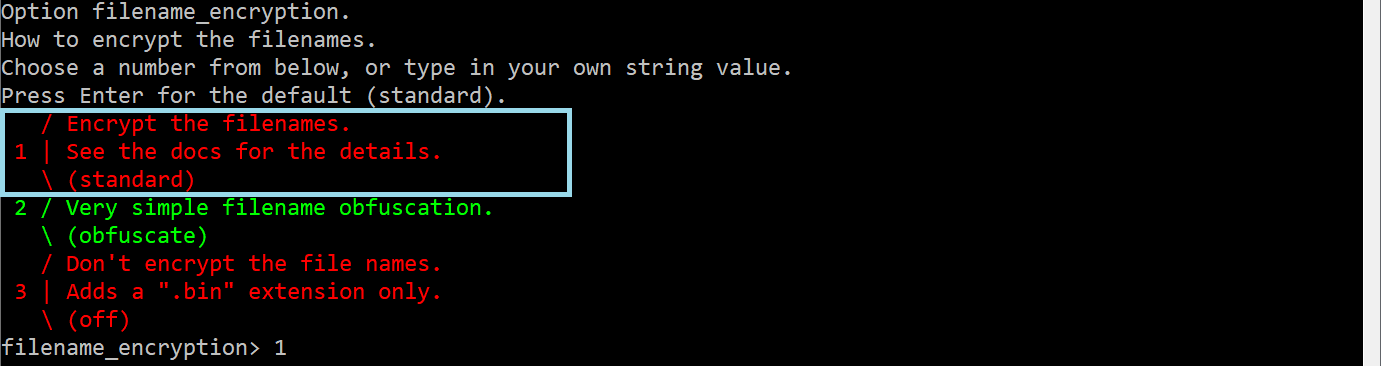
Then, select Option filename_encryption. Here, you can choose Encrypt the filenames, or leave it empty if you don´t want to encrypt the filenames.
Next, choose the directory Option directory_name_encryption. You can select Encrypt directory names or leave it empty if you prefer not to encrypt the directory names.

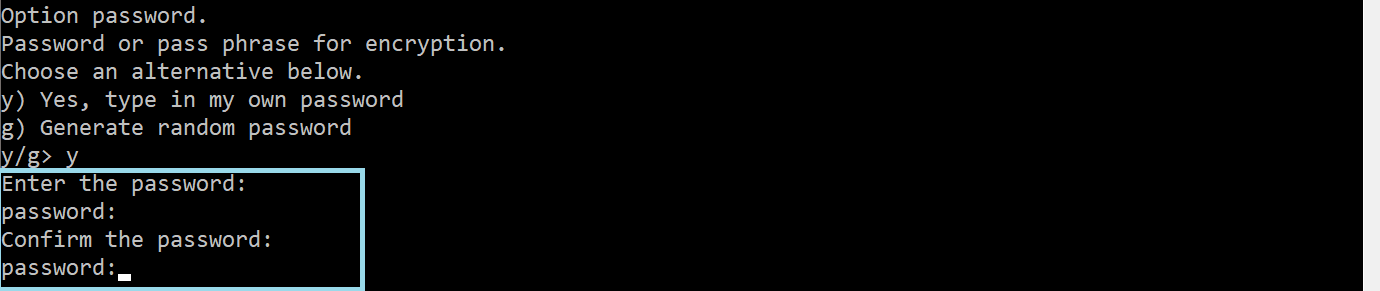
In the following step, choose an encryption password under the Option password.
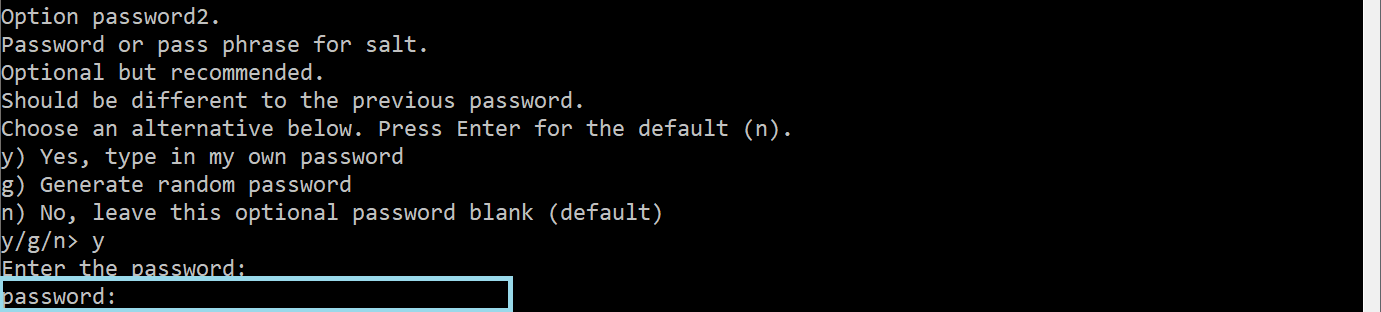
We also recommend selecting Option password2, which will be used as a salt for the encryption process.
the Edit advanced config option can be skipped by pressing n.

The configuration is now complete. In the next step, confirm the configuration by selecting y for the Keep this encrypted config remote option .

The final step is to verify the encryption. First, list the available configurations/connections.
rclone listremotes
cesnet_s3_encrypted:
cesnet_s3cl2:
Then, using the sync command, upload three pictures into the decrypted bucket.
rclone sync --progress --fast-list ~/source-dir cesnet_s3_encrypted:Afterward,list the decrypted bucket, where you should see the three uploaded pictures.
rclone ls cesnet_s3_encrypted:
  256805 DSC_0004.jpg
  337491 DSC_0006.jpg
  251493 DSC_0005.jpg
Finally, list the encrypted bucket, where the three files will appear as encrypted.
  rclone ls cesnet_s3cl2:test-encryption
    256901 1er0np7kppc9jvkt7kr8f9sn90
    337619 cuqqkkhsklbnf1eegkujfkrcl4
    251589 pelqqer8osssa4k8uon95a4o6c
Configuring the Encrypted Bucket Using the Graphical User Interface
To configure the rclone tool using this guide first download, unzip and install rclone. Instructions for this can be found in the first section.
First, launch the graphical user interface. Windows users should open the Command Prompt and run the the command below. This will open the rclone GUI in your web browser. Linux users can follow the same process by opening a Termial window and running the command listed below.
rclone rcd --rc-web-guiThe following steps are identical for Windows and Linux users.
Once GUI starts, click on the Configs (1) button in the left menu, and then click on the Create a New Config (2) button.
First, enter a Name of this drive (1) and then select the option Encrypt/Decrypt a remote (1) from the menu. After that, click on the Next button.

In the next step, specify the Remote to encrypt/decrypt (1). Here, it is important to select the already existing S3 profile/connection and the bucket name where you wish to create the encrypted space. The input format must be s3-profile:bucket-name. If you choose non-existing bucket rclone will create it. Next, choose a Password for encryption (2) and, optionally, Password for salt (2).

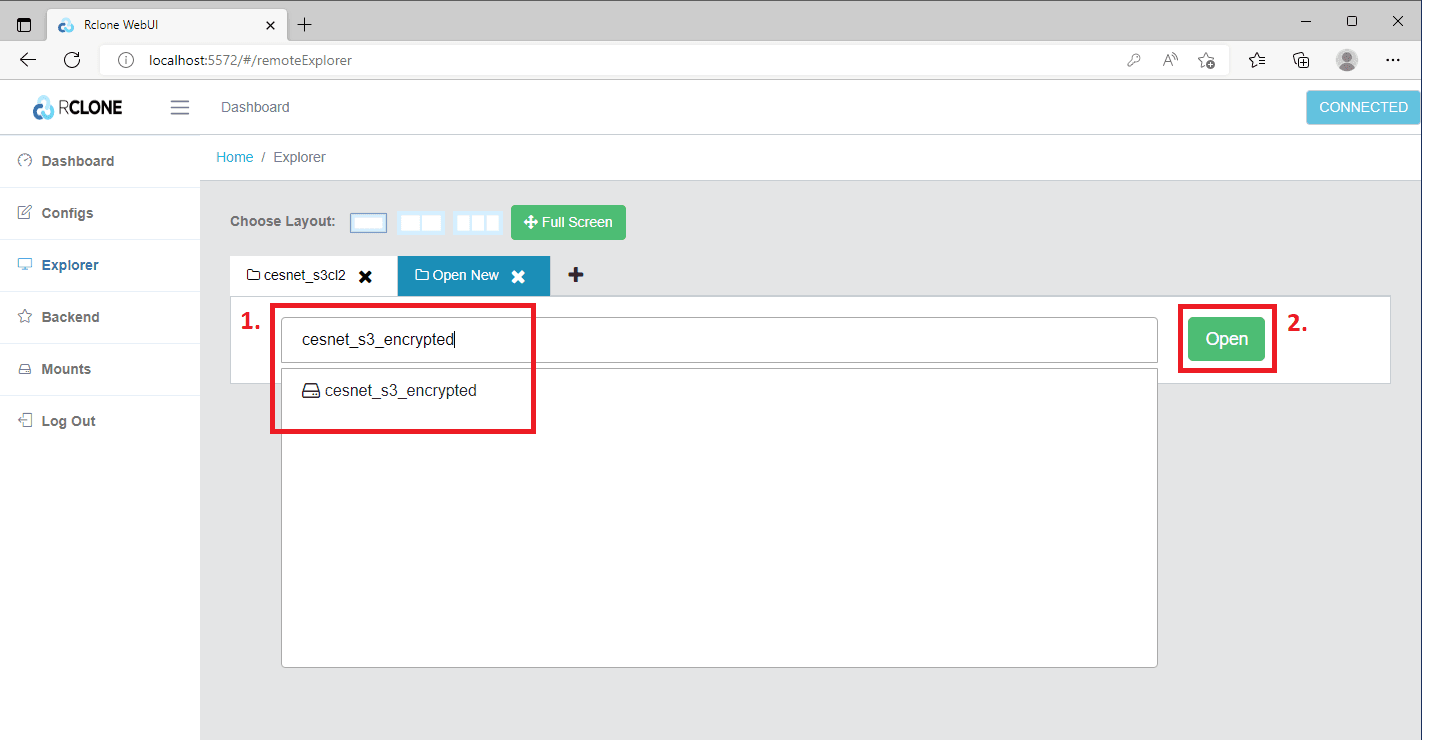
After that, click the Explorer (1) button. Now you are in browser mode. By clicking the + (2), you can open a new tab with the encrypted bucket.

In the field Type the name of remote you want to open (1), select he name of the encrypted bucket (1). Then, click the Open (2) button.
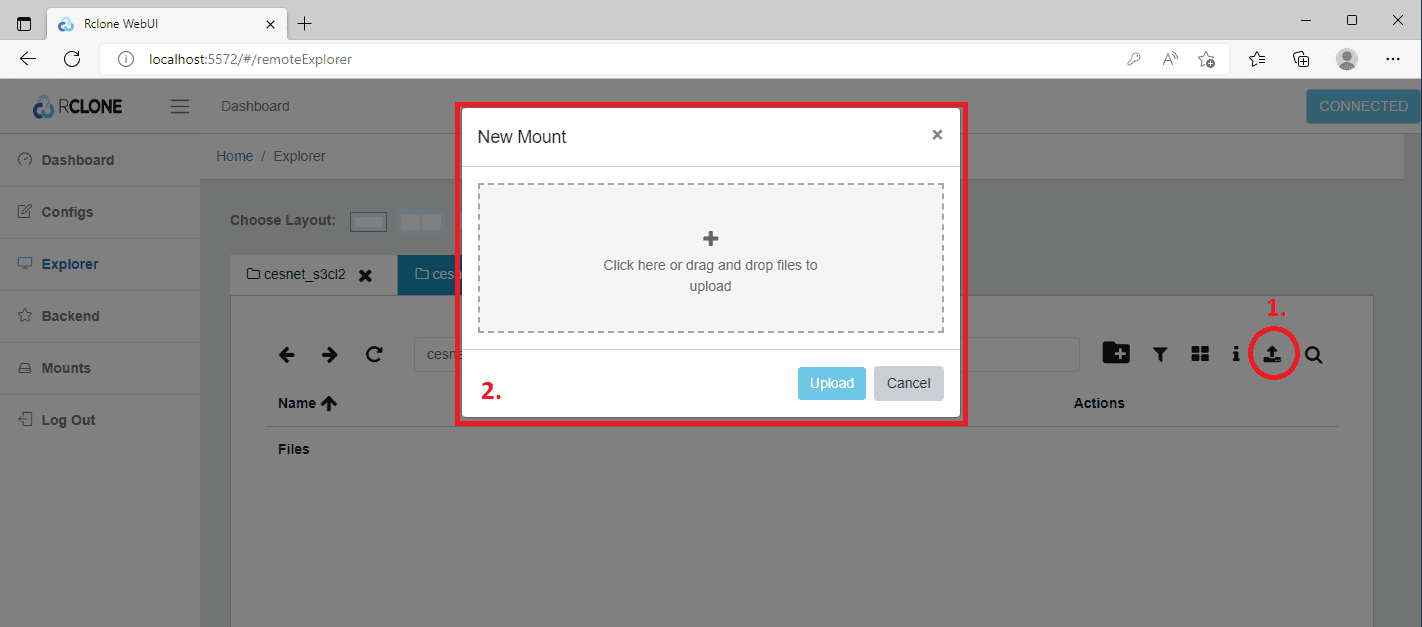
At this point, you can begin uploading the data you want to be encrypted. Click the Upload (1) icon, and you can either select the files from your local disk or drag-and-drop them using the interactive window (2).
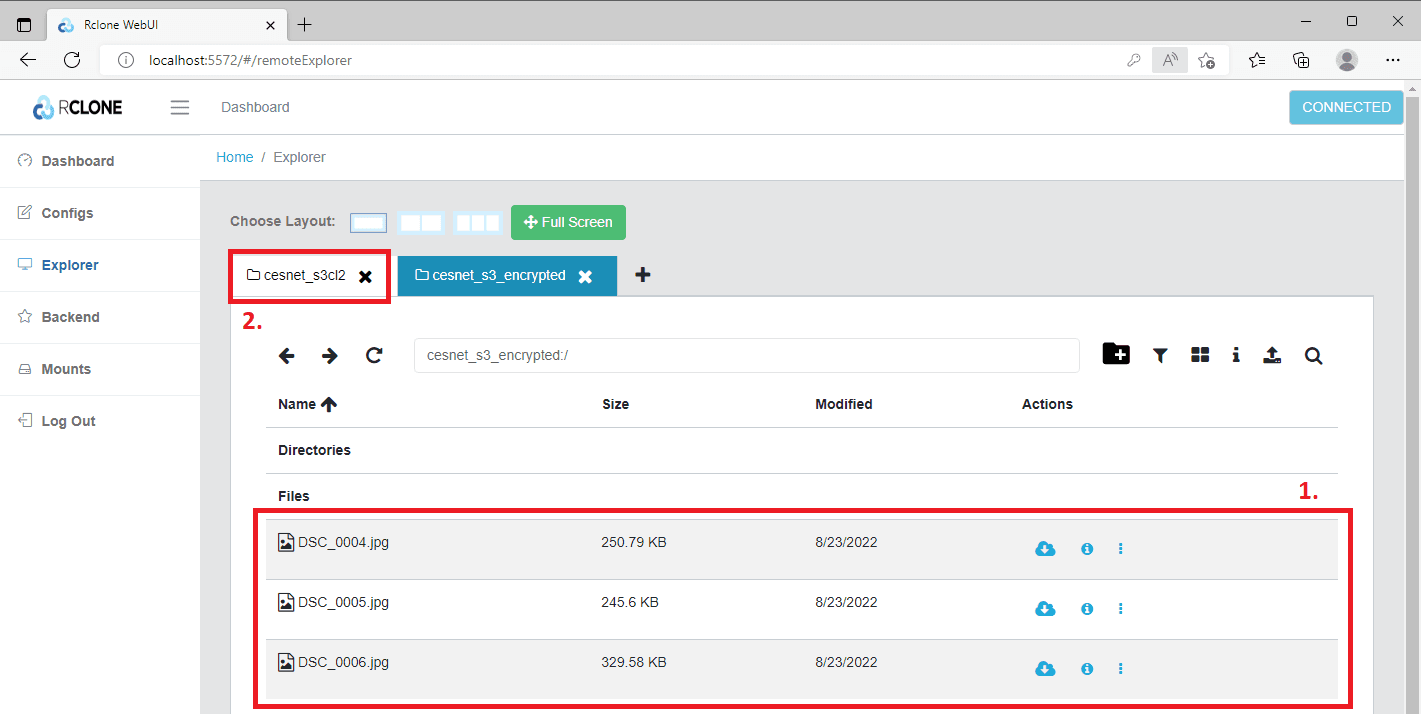
In the example below, we uploaded three images (1) into the decrypted volume. You can check the upload in the explorer by opening the remote S3 storage tab (2).
Finally, take a look at the encrypted bucket (1).

You will see that the three images (1) have been encrypted.

Configuration files for encrypted volumes
Configuration file for the encrypted volumes can be found in the previous section.
Verifying the Integrity of Encrypted Data
To verigy the integrity of encrypted data, it is necessary to use the cryptcheck command, as desribed below. Using the standard data integrity check workflow on an encrypted bucket may lead to significant issues, such as forced downloading of all data from the remote site, which can cause your client to stall.
  rclone cryptcheck --fast-list C:\Users\Albert\Desktop\test_sync shared_encrypted:dir01/

    2022/08/29 16:57:45 NOTICE: Encrypted drive 'shared_encrypted:dir01/': 0 differences found
    2022/08/29 16:57:45 NOTICE: Encrypted drive 'shared_encrypted:dir01/': 14 matching files
Improving the chceck speed
Whe using the cryptcheck command, we recommend including the --fast-list option. This option caches information about more than 1000 objects in a single request, significantly speeding up the checking process.
Sharing of Encrypted Buckets
Buckets can be shared within a shared space called a tenant or between users via bucket policies. To share buckets with encrypted volumes, you will need to share the encryption credentials (used for the encrypted volume in your bucket) with your colleagues. A shared bucket has to have a proper set up bucket policy.
Once the encryption is set up in your bucket, you only need to share the encryption passwords you used during the encrypted bucket creation, along with the bucket name, with your colleague. Your colleague can then use the guide above to configure the corresponding encrypted buckets on their machine using the passwords you provided.
Please note the next section, which addresss the need to change encrypting passwords, or loss of encrypting passwords.
Compromise of Encryption Passwords vs. Loss of Encryption Passwords
In case of compromising or leaking your encryption passwords, or if you need to change the passwords, the only solution is to create a new encrypted volume with new encryption passwords. All data must be transferred to the new encrypted volume, and the old one should be deleted.
You have two general options for this process. The first option is to upload your data from the local machine to the new encrypted volume, assuming the data is available locally. Once the data is uploaded, you can delete the old encrypted volume.
The second option is to use rclone to transfer the data directly from the old encrypted volume to the new one. The advantage of this method is that you don’t need to download the data locally to your machine and then upload it again. See the example below.
rclone copy old_encrypted_drive:dir01 new_encrypted_drive:dir01If you lose your encryption passwords, you will also lose access to your data!
In the case of encrypted buckets, the encryption is client-side. If you lose your encryption passwords, the administrators have NO POWER to restore your encrypted data.
Mounting the remote as a filesystem or a drive
You can mount (map) an existing remote storage (bucket) to be used by standard programs and tools.
Rclone mount creates a virtual drive that lets cloud storage behave like a local filesystem by translating file operations into on-demand network API calls with optional caching. It is well-suited for streaming media, browsing large cloud archives, and occasional file access where convenience matters more than raw performance or strict filesystem guarantees. It is not well-suited for databases, virtual machines, or other workloads that require fast, reliable, and fully consistent disk behavior because of network latency, caching delays, and weaker file-locking semantics.
Mounting in Windows
Find a drive letter that is not used (let’s say Z:) and run the following command in the Command Prompt window
rclone mount cesnet_s3_encrypted: Z: --network-mode --vfs-linksThis will create a (virtual) drive Z: and map the contents of encrypted bucket cesnet_s3_encrypted: to it as if it was a standard network drive. The rclone command will stay running on the foreground in the command prompt window and will block the window. Minimze the window and keep the program running to keep the drive mounted (open another command prompt window if you need to continue working with rclone). To unmount the remote, stop the rclone program by pressing ctrl+c in the command prompt window or close the window.
Mounting in Linux
Create a directory where the remote will be mounted (mount point) and run
rclone mount cesnet_s3_encrypted: path/to/mountpoint --daemonor ommit the --daemon option if you want to keep the program running on the foreground. To unmount the remote, either stop rclone (if running in the foreground) or use
unmount path/to/mountpointif rclone runs in a daemon mode.
Last updated on
